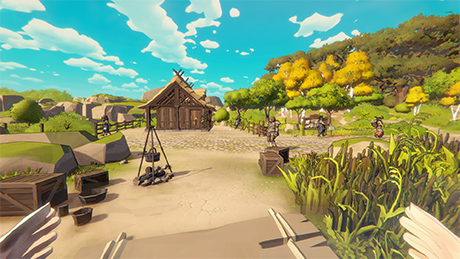
This video showcases every buildable structure and module available via the habitat builder in Subnautica 2, along with brief guides on how to use some of the key buildings and items.
I’ll be breaking everything down by its in-game category. For deep dives into specific individual items, you can check the in-game descriptions directly, as they already offer detailed explanations.
Note: This content is based on the Early Access version released on May 14, 2026, and is subject to change with future game updates and patches.
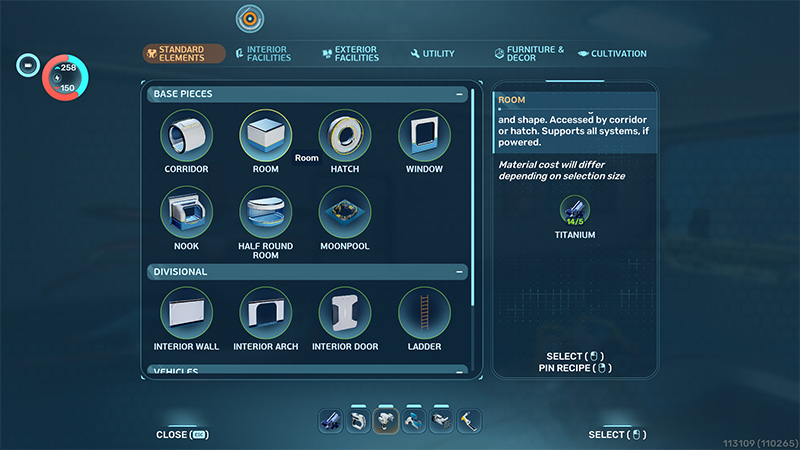
Standard Elements
This is the main hub for all core structures, including base rooms, interior walls, doors, windows, and corridor tubes.
Since the game is still in Early Access, we don’t know yet if they’ll add more structure types in future updates.
This sequel upgrades the rooms and building mechanics, making the whole process a lot smoother.
Used under fair use for commentary, criticism, and educational purposes.
Personally, my favorite feature is the expandable rooms. You can build some massive spaces, and when you pair them with large windows, the view looks incredible.
Rooms can be expanded not just horizontally, but also vertically using ladders to create multi-story layouts, which I love.
That said, across the entire series, we’ve never really seen actual indoor staircases—it’s always been ladders or vertical tubes. While that fits the high-tech sci-fi aesthetic, I’d honestly love to see a spiral staircase. It might take up more space, but it would look great and feel easier to navigate.
Just my personal take, though.
By the way, I did some testing with the corridor tubes. Right now, they only let you connect rooms horizontally; you can’t use them to connect vertically.
If I remember correctly, the previous game had dedicated vertical tubes with built-in ladders to link floors. But honestly, just using standard ladders to build vertically is still incredibly easy here.
Vehicle docking has also seen some tweaks. Docking bays can now be expanded into larger areas, making it much easier to get in and out. This is especially useful during multiplayer sessions so things don’t get crowded.
I haven’t personally jumped into multiplayer yet, so I’ll hold off on judging that for now and share my thoughts once I’ve given it a proper go.
The most vital structures in this category are the vehicle construction platform and the docking bay. Having these hook up directly to your base rooms is super convenient.
I’ll be diving deep into vehicles in a separate video, so I won’t linger on them too much here.
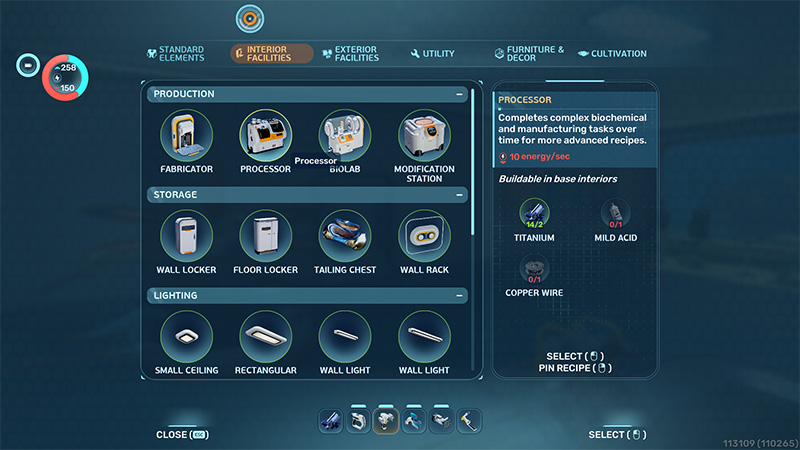
Interior Facilities
This category covers the core interactive equipment you’ll use inside your base, and it’s easily the most important group. It includes staples like the Fabricator and the Modification Station, alongside various storage crates, lighting options, and charging stations.
The sequel introduces several brand-new interior structures:
The Processor: This allows you to modify your character’s passive and active skills. In the previous game, these perks were tied directly to your gear. Now, they’ve been separated into a dedicated machine, giving you a lot of freedom to customize your build with a pretty wide variety of options.
The Biolab: In the past, these crafting functions were part of the standard Fabricator. This time around, it’s a standalone station, and the list of craftable items has grown significantly.
The Wall Rack: This is mainly used to display and store your gear. It’s incredibly practical, especially with multiplayer in mind, as it lets players easily grab the exact loadout they need for a specific mission.
The Biobed: This can be used to tweak your character’s attributes, though the customization options are still fairly simple at the moment.
Power Storage: I can’t quite recall if we had this exact item in the previous game, but it is incredibly useful here.
Solar panels only generate a limited amount of power and only work during the day. If you’re short on resources early on and can’t build advanced power generators yet, this battery backup is a lifesaver. It stores the excess energy generated during the day so you don’t run out of juice at night.
As for the other facilities carried over from the previous game, I won’t go into them here. Their functions are basically identical, and you can easily check the details directly in-game.
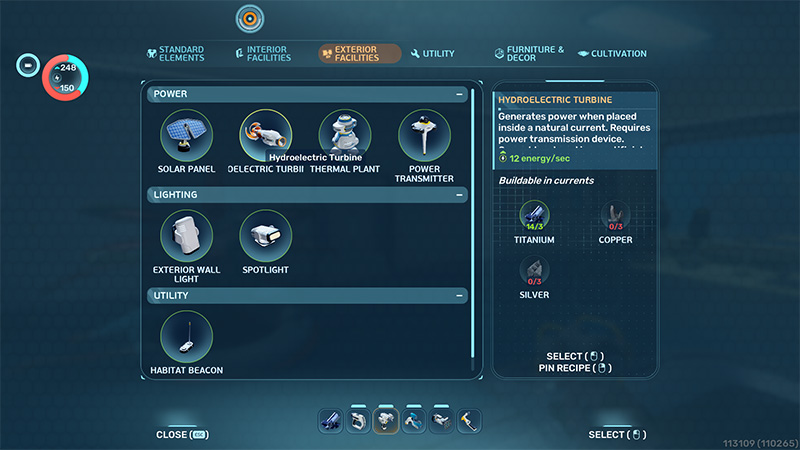
Exterior Facilities
This category has fewer buildable options, focusing primarily on power generation, outdoor lighting, and the Habitat Beacon.
The power generation mechanics in this sequel carry over the familiar setup from the previous game, featuring structures like the Solar Panel and the Thermal Plant.
The Solar Panel remains the most convenient option, requiring relatively fewer resources while offering great efficiency, making it the go-to choice for the early game.
The Thermal Plant, on the other hand, requires specific environmental conditions to generate power, which makes it a bit more challenging to utilize right at the start.
This game introduces a new option: the Hydroelectric Turbine, which also relies on specific terrain to function.
Fortunately, the current spawn point in the game is fixed, and there happens to be a suitable location for this turbine right near the starting area.
While this generator produces slightly more power than a solar panel, it requires power transmitters to route the electricity back to your base, which can demand a significant amount of resources early on.
Of course, all of this depends on one key detail: you must first find the necessary blueprints and unlock them in Survival Mode. If you haven’t unlocked these technologies yet, your building options will be much more limited in the early stages.
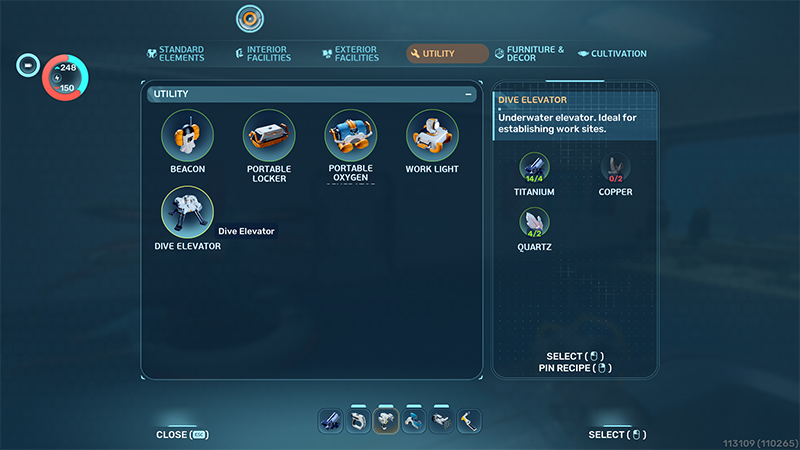
Utility
This category currently features only five items, two of which are brand-new to the series.
The Portable Locker, Beacon, and Portable Oxygen Generator return from the previous game, and their core functions remain essentially the same.
Let’s take a closer look at the two new additions:
The Work Light: This is used for area illumination and runs on batteries. In solo play, I personally didn’t find it all that useful since it occupies your hands, making the standard Flashlight much more convenient.
However, it definitely has practical value in multiplayer, where a teammate can place it down to provide lighting from different angles. It offers a wider radius and brighter light than a Flashlight, and it can be easily repositioned.
The Dive Elevator: This is a new device designed for quick descents and ascents back to the surface. It extends downward by a fixed distance, meaning you’ll need to build and chain multiple units together if you want to reach deeper areas.
I suspect its utility will shine more in multiplayer scenarios—for instance, allowing teammates to rapidly transport resources or quickly top off their oxygen.
Of course, this is all assuming you don’t have a vehicle yet. Once you acquire a vehicle, the usefulness of this elevator does drop off a bit.
That said, I haven’t tested yet whether multiple vehicles can be built in multiplayer. If players are limited to just one vehicle, this elevator will definitely still hold its value.

Furniture & Decor
This category consists almost entirely of indoor and outdoor decorations that you find—or more accurately, scan—during your playthrough.
The variety is quite extensive, allowing you to deck out your base to make it look a lot nicer and feel more comfortable.
While these items are primarily for visual aesthetics, some of them do support player interaction, for example, you can actually sit down in the Chairs.

Cultivation
Similar to the previous game, this sequel still allows you to plant and cultivate flora underwater.
While the new Growbed comes in a fixed size, you can now snap multiple units together just like base rooms. This lets you expand your planting area as needed, offering a huge boost to flexibility.
There are currently 8 types of plantable flora available.
These are especially vital in Survival Mode, as growing your most frequently used consumable plants right inside your base saves you the hassle of constantly heading out to forage for them.
Additionally, this category includes a unique structure: the Metal Farm.
Yes, you can actually “grow” minerals here!
Unlike plants, however, you need to manually place your target mineral inside first. It will then “grow” into a large mineral chunk in about two minutes.
Once that’s done, you’ll need to use the Sonic Resonator to break it down and harvest it. You just repeat this process over and over.
If you ever want to change the type of mineral it produces, simply insert a new mineral sample; otherwise, it will just keep generating that same resource.
Of course, this entire production process drains electricity, so you will need to keep it connected to a power supply.
Hopefully, future updates will introduce even more practical buildable items, allowing players to comfortably design their own underwater art spaces without always having to venture out on dangerous expeditions.